The Gang
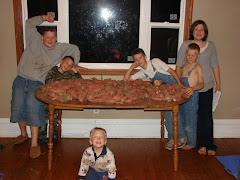
October 2008 Sweet Potatoe Harvest
 7:39 PM |
  Posted by
Shirley
Posted by
Shirley
We spent the afternoon blanching and freezing 5 more quarts of beans (green, purple, white with purple speckles, and yellow) and 1 quart of broccoli. The purple and white with purple speckle beans were part of our weekly veggie share from our local CSA. What is a CSA you ask? It stands for Community Supported Agriculture. In many communities you are able to find a CSA where several farmers work together to provide chemical free or organic food to local consumers. The consumer pays a fee for a ½ or full share and receives a box or bag(s) full of food anywhere from once a week to once a month. I was so excited to find a CSA only 3 miles from our new house! It is run by a young couple who have a sweet little 2 yr old boy. They are currently the only farmer contributing to their CSA. They grow over 35 types of veggies and often more than one variety of each type of veggie. I was able to join their CSA even though 2 months are already gone for an adjusted rate. So far we have had the opportunity to try: candy cane beets, purple potatoes, red & yellow onions, leeks, fennel, basil, green zucchini, yellow summer squash, cucumbers, red leaf lettuce, green leaf lettuce, red potatoes, purple beans, white with purple speckle beans, green onions, and swiss chard! It is really fun going to pick up our bag of produce each week then coming home and unloading it with the kids. We also receive recipes! I'm so excited about being able to buy organic chemical free food that is VERY local, so FRESH, and very reasonably priced!!
This evening I decided to make creamy broccoli soup with another quart of broccoli that I didn't freeze. Often I'll add potatoes to the creamy broccoli soup since the recipe is actually a Potato soup recipe that I converted to a broccoli soup because the kids like the Potato soup so much. I decided not to use potatoes so was looking for another root veggie to add to the soup. I have so many lovely veggies in my fridge right now but beets are the only root veggies that I have in excess right now. I was hoping to disguise the beets in the soup so the kids wouldn't realize they were eating beets. I boiled them, deskinned , cubed and added them right at the end of the cooking time. As I stirred the soup it started to turn a very nice creamy shade of pink. :-) Each of the kids started to come in asking what was for dinner and I told them, “This soup is a gourmet variety only sold in the best restaurants, it is called, Valentine Soup! It tastes a lot like my potato soup but has a secret ingredient!” After our Bible and prayer time I served this lovely pink soup to the kids. We were all totally shocked to absolutely LOVE the soup!! The beets were VERY sweet and added a really nice flavor to the soup. Each bite was a bit different because sometimes you'd get a beet which was very sweet, others a bit of broccoli or some freshly cut celery, which was also very sweet. I went out and cut the celery right before making the soup and used all the beautiful green leaves in the soup. I have never tasted such a sweet full flavored celery as the celery cut from our garden. The kids and Phil just raved over the soup the entire meal!! I've been making a wide variety of “enthusiasm soups” lately because I want to use all the fresh veggies in a variety of ways: breakfast egg soufflés, soups, side dishes, grilled, etc. I was very thankful that my beet experiment ended a little better than another great chef who once tried liver in her enthusiasm soup.
 Labels:

It has been a few days since posting. Nothing major has been happening here. I organized my canning jars and unpacked most of my stoneware yesterday. We've been trying to keep up with the garden, laundry (hang drying everything since we don't have a dryer yet) and keeping the house in order. It is amazing how much easier it is when there are no distractions... like Internet or TV. Mind you the house isn't immaculate, but it is usually company ready and pretty clean (my mom would be proud of me).
So, is anyone wondering about how the garden is going? 
This is what I see when I walk through the gate into our garden. Can you see all the beautiful green plants? For those of you who have seen or heard of our failed attempts the past two years, you'll be SHOCKED to hear me say that our garden is beautiful and about 85% weed free. In a garden as large as ours it is almost impossible to keep it completely weed free. The interesting thing is that this years garden is about 3 times larger than last years. The big difference is that we have a desire to really work at it and we have researched out how to do it. Over the past couple days I rescued the strawberry plants from the weeds. About 40 of the 50 we planted have survived. The few berries we have gotten have been so sweet, more like candy than fruit! We've already started to cut broccoli. For some reason our broccoli is flowering instead of making large heads, I'm not sure why. If any of you know please leave a comment and share what I should be doing or not doing to get nice big heads of broccoli. Some of the broccoli plants are about mid thigh on me, so the plants are definitely large enough. All have some broccoli forming. We now have enough broccoli to have a meal with cheesy broccoli once a week plus have broccoli on salads a couple times a week. YUM!
 Elizabeth took this picture of me standing in the middle of the garden so you could get a bit of an idea as to how large it is! This is the view I see of the garden from my kitchen window.
  This is the view of the garden from the road. You'll notice there appears to be several straw piles in my garden. These are my potatoes. I was told by a friend that instead of using soil to cover my potatoes I should use straw. I guess the straw makes it easier to harvest and gives a good yield. It will also be great to till into the garden this fall to add to the health of the garden soil. That same friend told me to put straw around all my plants. She said that the straw would help to keep back the weeds as well as to keep the soil moist around the plants. Since it has been a VERY warm lately I have put straw around everything except the corn, onions, garlic, and the new squash & cucumbers that are emerging. Our squash veggies (butternut, spaghetti, cucumber, pickling cucumbers, yellow & green zucchini) went in a little over a week ago along with more bush beans and they are coming up nicely.
I have two beds of red onions. One is almost ready to harvest, these are the ones I started from seed and I think there are only about 16 onions, though I haven't counted. We will start using them once I use up the organic ones I have in the pantry. The onions that I started from seed are doing better than the ones from sets. Next year I will do a LOT more from seed and will succession start them indoors. The green bush beans & peas are both flowering. I'm not sure which pea I have that is doing well, a rabbit mowed down about ½ the pea plants. I plan to plant a lot more peas in August for fall harvesting since I only have about 5 plants that are doing well. Many of the tomato plants have flowers and a few have fruit forming finally!! We are still planting carrots. I planted some a few days ago and will do more today or tomorrow. From now through August I plan to plant about 6 rows of carrots every 5-7 days. My rows are three feet long and spaced about 3 inches apart. I also have more beans to plant. Since the ones I planted a week ago are all up I plan to do about 30 more plants today. We never seem to have enough green beans to last the year. This year I'm doing succession planting and hope to have my freezer full of beautiful green beans. August will start a time of even more planting as we prepare the fall crops and winter boxes.
My dear hubby knows that I really want to keep up with the garden. He also knows that I HATE getting up early. Today he woke me with a sweet kiss and breakfast in bed. He served me a yummy omelet with some green grapes and coffee with fresh cream. He knows that I don't like mornings yet he also knows that I love getting up to kisses and food! :-) I got up, had some Bible and prayer time, made the kids donuts (the recipes is below), and headed out to work in the garden for the next 2 ½ hours. Nathan came out at some point half naked, so I had to head up to the house in my mud moon boots to get his clothes. The soil was very wet because of last nights rain so it clumped badly on my shoes adding about 2 inches of mud and a couple pounds of weight to each shoe. Last week when Caleb had his surgery and I worked in the garden early in the day, Nathan came out with two shirts on, one where it was supposed to be and the other around his waist. :-)
It has been a while since I posted a recipe. Todays recipe is Whole Wheat Soaked Donuts! My children LOVED them!
Whole Wheat Cake Donuts
3 ¼ cups whole wheat pastry flour or freshly ground flour of your choice
2 tsp baking powder
½ tsp cinnamon
¼ nutmeg (I left this out because I don't have any right now)
2/3 cup kefir or milk (I used kefir)
¼ cup butter melted
2 eggs
2/3 cup sugar
1 tsp vanilla
oil for frying (I used safflower, I'd like to try them in coconut oil but cannot afford to this month)
Powdered sugar, granulated sugar, or an icing or glaze of your choice.
Combine flour, baking powder, spices and ¼ tsp sea salt in a bowl.
In a different bowl beat eggs, sugar and vanilla until thick.
Combine melted butter and milk in a separate bowl.
Add flour and milk mixtures to egg mixture alternately beating well after each addition.
Cover and let set at room temperature over night.
Refrigerate for 1-2 hours in the morning.
Roll out on a lightly floured surface ½ inch thick. Use a cup to cut 2 – 2 ½ inch circles or a donut cutter. Use a corer to get a middle circle and donut hole if you don't have a donut cutter.
Fry for 1 minute or until golden brown, then flip with tongs or slotted spoon and cook for another minute.
Cool slightly on a rack then sprinkle with powdered sugar (if you have a sugar shaker) or put sugar in a baggie and shake donuts to get them covered.
COOKS NOTE: If you have a large family you will need to double this recipe. This made 12 donuts and donut holes. If I was making these again I'd double it because Phil and I didn't even get to try them!
Tonight at dinner Caleb was giving us a digestive tract lesson. He didn't care for the veggies served (garlic Parmesan grilled zucchini & baked potatoes) with dinner so he only ate his grilled pork chop then he said he was full. We were questioning him as to whether or not he was REALLY full. Phil said something about Vanilla Ice Cream to see if he'd all of a sudden have room in his tummy. He said he'd have room for Ice Cream because only the food side of his tummy was full. He had room on the desert side of his tummy! We enjoyed the mini lesson that followed talking about how his tube divides so food goes down one side and dessert down the other then they come together at the bottom until they go all the way through and eventually come out the front or back! :-) My comment: “I sense the need to do a unit on the digestive system this year in school!” :-)
If the Internet is cooperating tonight I'll try to post a couple pictures of the garden. If not I'll at least load up the one that Elizabeth took so you can see how large it is. I wish I could post more pictures of the garden showing off each individual veggie. I am so thankful and in awe each time I walk through. God is so good to provide all this wonderful food for our nourishment and enjoyment. Today as I was sweating while working on weeding the leaks, beans, yellow beans, red onions, and planting more beans & carrots I was struck with how it must have been difficult for Adam to have to work hard after having things “spoon fed” to him in the Garden of Eden. Phil and I have talked much about how “lazy” we've been over the past 13 years of our marriage. This little homestead farm is forcing us to get a small picture of what hard work really is when it comes to providing good food for our family. I say only a small picture since we aren't farming the land while trying to raise animals and work a garden. Our dream is to some day be able to grow our own crops for our livestock both the four legged and the two legged kind! :-) God has seen fit to only give us what we can handle as we learn how to do more for our family and I'm thankful that He is taking us through this journey one step at a time!
Well, for not having much to post about I've sure managed to kick out a VERY long post once again. I hope it was enjoyable!


One challenge I have found during our transition to a nourishing lifestyle is that of having snacks on hand for the kids to grab quick. Fruit is GREAT! However, my kids go through it faster than I am able to shop. Today I'm sharing a couple recipes that don't necessarily meat the qualifications of the Nourishing Traditions style of cooking but they are a much better snack than what you get buying granola bars from the store. I found this recipe when I was on a quest for a healthy granola bar for my children that did NOT have High Fructose Corn Syrup. I make these 2 times a month and we've taken them to "pot luck" type activities where they have been a huge hit! They are GREAT for camping, hiking, and sack lunches. Enjoy!
Homemade Granola
4 cups oats NOT quick. Use old fashioned, rolled or thick cut oats.
2 cups nuts (I use a combination of raw almond-sliced or chopped, pecan, peanut, cashew, etc.)
1/4 cup sesame
1 c non sweetened coconut flakes
1/4 c wheat germ (I use 1/4 cup of my freshly ground flour)
1/2 cup sunflower seeds
1/2 cup Virgin Coconut Oil (you can use sunflower or safflower if you are not yet a convert to Nourishing oils. Do NOT use olive oil, it has too strong of a flavor)
1 cup Honey (you can add a little mor honey if you like it a bit sweeter)
1/2 cup raisins
1/2 cup other dried fruit
Cooks note: In my opinion this recipe needs a little cinnamon. However, my family are not real cinnamon fans so I haven't added it yet. If you enjoy cinnamon and plan to add dried apples, you'd want to add 1 tsp cinnamon to the granola mix before baking.
Combine all the ingredients in a large bowl until mixed well. Divide the mixture between 2 Large Stoneware Bar Pans or Jelly Roll Pans. Cook in a 300 degree oven for 30 minutes. Be sure to stir the granola every 10 minutes in order to allow for even browning. Remove from the oven and pour onto parchment or wax paper. Add raisins and other dry fruit if you want to. Allow to cool completely then break it up and store it in an air tight container. We love sprinkling a tablespoon or 2 onto our yogurt or yogurt/fruit bowls.
Chewy Granola Bars
Recipe courtesy Family Circle Magazine
1/2 cup plus 2 tablespoons packed light-brown sugar (I use sucanat)
1/4 cup plus 2 tablespoons honey
1 tsp vanilla
1/4 cup unsalted butter
3 cups granola (see recipe above)
1/2 cup coconut (the recipe calls for sweetened, I use unsweetened and works great)
1/2 cup golden or regular raising (I leave these out because my family does not like raisins, instead I'll add another 1/2 cup of raw nuts: pecans, peanuts, or cashews)
3/4 cup chocolate chips or carob chips
1/2 cup slivered or sliced almonds
1. Combine sugar, honey, vanilla and butter in a medium-size saucepan. Bring to a boil over medium heat. Lower the heat and let it simmer for 2 minutes or until the sugar is dissolved. Allow mixture to cool for a couple minutes.
2. Meanwhile combine granola, coconut, raisins, 1/2 cup chocolate chips and almonds in a large bowl.
3. Stir brown sugar mixture into the granola mixture. Spread into a 13 X 9 baking pan. Press the remaining chocolate chips into the top. Refrigerate 2 hours or until completely cooled. Allow to sit at room temp for 15 minutes before cutting into bars.
Cooks note: If you double the recipe you can spread it into a Stoneware Bar Pan or Jelly Roll Pan.

My first try at cheese looks GREAT! Sam is holding it on the cutting board in the picture. He tried some this morning on his Farm Fresh Goose Egg Omelet and said it tasted really good. It is supposed to sit out on the counter for a couple days to dry then be waxed and stored for a month to age. I highly doubt it will make it to that stage since we have been without cheese for a few weeks now and the kids are anxious to try it. Thankfully I have a friend who is able to share about 10-15 gallons of farm fresh milk with me this weekend, as well as more next week. I will plan on making at least 3-4 2 pound rounds of cheese with some of this milk. It takes 2 gallons of milk to make approximately 2 pounds of cheese. Since I know I'm going to be getting extra milk over these next couple weeks I will probably let the kids eat this first block of cheese as a snack and on our soup tomorrow.
I made some whole wheat/spelt bread last night too with over 70% of the grain soaked in Whey for 24 hours. The bread looks and smells WONDERFUL! This is a nice transition bread recipe for the beginner soaker like myself. I hope to get to the point where I am confident soaking almost all the grains for baking. Here is the recipe that I used:
Soaked Grain Whole Wheat/Spelt Bread
7 1/2 - 8 cups Freshly Ground Hard Red Wheat and/or Spelt Flour (I used 4 wheat & 3-4 spelt)
3 tsp Yeast
1/4 cup water
2 cups plus 3 oz Whey or buttermilk
1/2 cup sucanant (I have not tried it with honey yet but I'm sure it would work, you'd just need a bit more flour because of the added moisture)
5 Tbsp butter
2 tsp salt
1. Mix 5 cups flour with whey or buttermilk (buttermilk does add a bit of a bitter flavor, adding more sugar or honey helps) in a bowl with a lid. Mix well and cover. Leave it in a warm spot for 12 - 24 hours. 24 hours is best.
2. When you are ready to bake the bread. Put the water, butter & sugar in a small pot and melt butter.
3. While butter is melting put 1 cup flour, 2 tsp salt and 3 tsp yeast into a bowl.
4. Add the butter mixture to the flour mixture and mix with a dough hook for 2-3 minutes.
5. Add soaked grains and kneed with a dough hook for 6 minutes. Add more flour if the dough is too sticky.
6. Remove dough from bowl, grease bowl with olive oil or coconut oil. Put dough back into bowl turning once to coat with oil. Cover with a wet cheesecloth or clean wet dish rag. Put in a warm place to rise until doubled.
7. When the dough has doubled in size punch down and divide into two globs of dough. Shape into loaves and put into two greased loaf pans (I prefer stoneware). Allow to rise until doubled in size.
8. Bake at 375 degrees for 30-40 minutes or until loaf is browned and hollow sounding.
I'm enjoying baking breads & pancakes with soaked grains. The dough of the breads is beautiful and elastic much like a white bread loaf but SOOO much healthier!! The pancakes are so light, fluffy, and loaded with wonderful flavor and fiber!
It really is fun making all these things for our family from farm fresh, organic ingredients! I think some nice grilled cheese sandwiches are on the menu for lunch today!
UPDATE: The cinnamon loaf didn't make it through the evening. We had it for an early evening snack and it was YUMMY!! This recipe is a keeper!! I think I am going to try to soak my grains in the yogurt next time. I'm all out of WW Pastry flour now so I'm going to be grinding my grains fresh 1 - 2 times a week now. Tonight Phil is putting together my new grain mill and we are all excited to try it!
Yummy Yogurt Bread
Makes: 2 loaves
7 to 7 1/2 cups Whole Wheat Flour
1-2 TBSP Flax meal
1 cup Oats
2 package active dry yeast
3/4 cup sugar -- I left this out but you could use honey or sucanat.
2 teaspoons salt
1/2 teaspoon baking soda
1 1 2/ cups plain yogurt
1/2 cup water
1/2 cup butter, at room temperature
4 eggs
1.In a large bowl, whisk together 3 cups of the flour with the yeast, sugar, salt, and soda. heat the yogurt, water, and butter in a saucepan over low heat until the butter melts; the mixture should not be allowed to simmer. Add the yogurt mixture to the flour mixture and blend well. Add the eggs, mix well, and then beat vigorously by had or using the stiff hook of an electric mixer at medium speed for 3 minutes. Stir in 1 cup oats and enough of the remaining flour to make a stiff dough, approximately 5 cups.
2. Knead the dough on a floured board (or work it in an electric mixer with a dough hook) until it is smooth and elastic - about 5 to 10 minutes. Place in an oiled bowl and turn the dough over to oil the top. Cover and let rise in a warm place about 1 1/2 hours or until doubled in bulk.
3. Punch down the dough and divide it in half. At this point you may wish to add cut-up dried fruits, cinnamon, or nuts. Form 2 loaves and place each in a well-oiled (I used coconut oil) 8x4-inch loaf pan, cover, and let rise in a warm place for 45 minutes or until doubled in bulk. Preheat the oven to 375 degrees F and bake the loaves for 25 to 30 minutes, until bread is a rich golden brown. Remove from pans and cool on wire racks.
Tonights Menu:
Taco Meat
Grated Raw Mild Cheddar Cheese
Sliced Spinach & Mixed Greens
SalsaThe
Sour Cream
Sprouted Organic Wheat Soft Tortilla Shells
Taco Seasoning Recipe:
This recipe is supposed to be added to 1 pound of meat. We find we like it better with two pounds of meat or it is a bit spicy. This can be made in larger quantities and put in an air tight container. Then use about 2 tbsp per pound or as much seasoning as your family prefers!
2 tsp onion powder
1 tsp chili powder
1/2 tsp crushed dried red pepper
1/4 tsp dried oregano
1 tsp salt
1/2 tsp garlic powder
1/2 tsp ground cumin
If you prefer more of a tomatoey (is that a word??) taco meat, you can add some diced tomatoes or a can of diced tomatoes. Currently I have to cook tomato free because of my oldest sons psoriasis.
Today's transform your kitchen tip: Try hot cereals for breakfast. I only buy old fashioned or thick organic oats. Currently only my older two kids enjoy oatmeal. But I torture them all by making them eat it once a week. We add a little raw honey or organic sucanat to sweeten it up. Sometimes I sneak in a little ground flax. If our economy continues to crash hot cereals will be one of the most economical breakfast's. So it is due time that we start teaching our kids how wonderful and healthy "porridge" really is!
Menu:
Crock Pot Round Steak
Organic Semolina Egg noddles
Steamed Peas
Salad
WW Biscuits or WW Rolls (whichever I have time for)
Apple Pie w/ cool whip (the freezer kind.... not my favorite but I have one I need to use up)
Crock pot round steak
1 pastured beef round steak
1 bottle Annies Organic French Dressing
1 recipe of onion soup mix (below)
Place steak in bottom of crock pot. You can cut it into thirds to make it fit if you have a smaller crock pot. Sprinkle meat with the onion soup mix. Pour French dressing over the meat. Swish the bottle and pour the water/dressing over the meat. Put on low all day, or on high for a few hours. We serve this meat with sauce over egg noodles or brown rice.
Onion Soup Mix
You may be wondering WHY I make my own onion soup mix. First, most have gluten or wheat in them and my Thomas cannot have gluten. Second, onion soup mix usually has MSG and/or other flavor enhancing preservatives. Third... it is really easy to do and I'm never running to the store for a packet of onion soup mix! :-)
1/4 cup minced dehydrated onion
2 TBSP powdered bouillon (been chicken or veggie, make sure your source for bouillon is MSG & preservative free too)
1/2 tsp onion powder
1/2 tsp salt.
Sometime this week I'll make tacos and give you my homemade Taco seasoning recipe too! First I have to make my sour cream from our pasture fed raw cow's cream & the buttermilk that was left after we shook the rest of the cream into butter.
Tonight (Sat evening) I just put a pastured fed beef roast in my crock pot with sea salt & ground pepper and a sliced organic red onion. This will cook on low until we get home from church tomorrow.
Sunday afternoon menu:
Sliced Roast over Fresh Salad
Shortly Sauted Asparagus in Virgin Coconut Oil (we like ours crisp tender with salt & pepper)
Whole Grain Bread (the second loaf from yesterday's batch)
Raw Organic Butter
Saturday evening:
Layered salad
Whole Wheat Buttermilk Biscuits
Recipes:
Use as many fresh organic veggies as possible.
Our salad will be in this order:
Raw Baby Spinach
Romaine Lettuce
Spring Greens
Finely diced red onion
sliced carrots
frozen peas thawed
2 hard boiled eggs diced
1/2 pound crisp bacon
1 cup mayo with 1 tsp sugar (when I run out of my miracle whip & mayo I will start making my own.... I'll let you know how it goes!!)
Whole Wheat Buttermilk Biscuits: I will double this recipe so I can use the extras for biscuits & gravy in the morning.
2 cups Whole Wheat Pastry Flour
1 TBSP Baking Powder (aluminum free)
1/4 tsp sea salt
1/3 c organic palm shortening or virgin coconut oil
3/4 cup buttermilk
In a bowl combine flour, bk pwd & salt & mix.
Cut into flour the shortening until it is in the consistency of course pea balls.
Gently fold in buttermilk until dough ball forms.
Put onto a lightly floured cutting board and mix only until their is no more dry ingredients. When making whole wheat biscuits the trick to them being fluffy is NOT to knead and over mix them.
Once the dough is mixed press with fingers until 1" thick. Flour a glass about 1" up and use it to cut your biscuits.
Place on a stone about 1-2" apart.
Bake in a preheated oven at 450 degrees for 10-12 minutes or until golden brown.
Have a Happy Healthy Lords day!!
I'm off to plant 84 tomato plants and 48 pepper plants!! Here is to fresh organic food for almost free!! Hip Hip Horray!
Many Saturdays we only have 2 meals. A large brunch between 10 & 11 a.m. Our brunches usually include eggs in some form, potatoes in some form, and a bread in some form. Why no fruit?? Because fruit is our "snack" in the afternoon. Today I withheld the bread because we were having potatoes. Since a few in our family are working on loosing weight the potatoes were enough of a starch for brunch.
Today:
Brunch
Egg & Spinach Bake
Hasbrowns & red onions
Fresh Farm Milk
Dinner:
Creamy Potato Soup
Fresh Greens Salad
Homemade whole grain & flax bread
Recipes:
Egg & Spinach Bake
10 pastured organic eggs
1 cup Fresh Raw Milk with cream in it still (you could also use 1 c raw cream)
Onions
Peppers
Spinach
Cheese (swiss or a sharp cheddar are really nice)
Virgin Coconut Oil
10" skillet that is stove top and oven safe (cast iron or good quality stainless steel)If you do not have a skillet that is also oven safe you will have to do your sauteing in a pan then dump everything into a casserole or pie dish to bake in the oven.
1. Preheat oven to 350 degrees. Preheat skillet on Medium heat for a few minutes.
2. Chop onion of your choice (green, red, sweet vidallia, etc) and peppers if you like them. Today I used two green onions and about 1/4 of an organic green pepper (red would be pretty too).
3. Put a heaping tablespoon of Virgin Coconut oil in the skillet, melt and swish, then add onions & pepper sauteing until just soft (I don't like to over cook them). Add a heaping handful of sliced organic baby spinach and cook for only about 1 minute.
4. While onions & peppers are sauteing. In a bowl mix up your eggs, milk & grated cheese (about 1 cup of grated cheese). Add just a little sea salt (not much or it makes your eggs rubbery) and freshly ground pepper to taste.
5. After your spinach has sauted for just a minute spread it and the onion/pepper mix evenly over the bottom of the pan. Gently pour the egg mixture over the veggies.
6. Place pan in the oven for 10 minutes, if not fully set or golden crank the temp to 45 and cook for another 5 minutes or until golden.
Serve with homemade onion & potato hashbrowns and 1 cup of raw milk per person.
Potato Soup
3 stalks Celery
1 large Onion
bacon (1/2 pound)
1/4 - 1/2 cup dried chicken broth MSG & preservative FREE (see note below if you wish to use homemade stock)
2 1/2 -4 pounds of potatoes (red are wonderful because just scrub and use)
1 qt water
1 qt fresh milk
1 tsp pepper
1/4 cup fresh parsley or 2 tbsp dried
1 tsp sea salt
3/4 cup whole wheat flour
3/4 cup raw organic butter or Virgin Coconut Oil (start with 1/2 & 1/2 then increase to full Virgin Coconut Oil as your family gets used to the coconut oil taste)
1 c raw organic heavy cream
1. Wash red potatoes and dice into bite size pieces. Cover with water in a pot and boil for about 10 minutes or until just soft cooked.
While potatoes are cooking:
1. Chop celery, onion, and dice raw bacon.
2. Place raw diced bacon in large stock pot and start to cook. After a few minutes add the celery and onion. Saute until bacon is crisp. Drain fat (especially if you are not using organic pastured bacon. If you are using organic pastured bacon then you can leave the fat because it is good for you!!)
3. Add to stock pot: water, milk, chicken broth powder, pepper, salt, parsley, and potatoes. Heat through but do NOT boil!!
4. In a skillet melt your butter/coconut oil. Add flour and cook for 1 minute.
5. Whisk rue into pot of soup and cook until thickened. DO NOT BOIL!
6. Just before serving add 1 cup heavy cream.
7. Serve with fresh thinly sliced green onions and a small sprinkle of sharp cheddar cheese if you want to be fancy!
CHEFS NOTE: If you are blessed to have a source for pastured organic chickens and you make your own broth from the bones, you can use 4 cups of that broth instead of the 4 cups of water w/ powdered chicken broth.
PLEASE NOTE: This is a very heavy and filling soup! I only allow my kids to have one serving of about 1 - 1 1/2 cups. We then serve it with salad and crackers or fresh bread.
Whole Wheat, Oat Bread
4 - 5 cups Whole Wheat Pastry Flour (when I get to start using my grain mill I'll put in some recipes for "real" wheat, rye, and other types of bread items)
1 pkg active dry yeast (or 2 1/2 tsp from bulk yeast)
1 3/4 c water
1/3 cup sucanant or honey
3 tablespoons raw butter or virgin coconut oil
1 tsp sea salt
1 cup thick organic oats
2 tbsp organic flax meal
1. In a large mixing bowl (kitchen aid if you have it) stir together 2 cups flour and the years. In a sauce pan heat the water, sugar, oil/butter, and salt just until the butter/oil melts. Add water to dry mixture. Beat for 30 seconds then scrape bowl. Mix for another 3 minutes on high.
2. Add oats, flax meal and 1 cup flour. Mix well.
3. Slowly ad the remainder of the flour until you have a nice soft dough ball. Kneed for about 6 minutes in the kitchen aid or kneed by hand for 8 minutes adding flour as needed.
4. Remove dough from bowl and coat with virgin coconut oil. Put dough back in and cover with a clean towel. Place in a warm place until dough is doubled in size.
5. Punch down and divide the dough into two even lumps. Put on a cutting board to rest for 10 minutes.
6. Shape each dough ball into a loaf and place in a coconut oil greased stoneware loaf pan. Lightly brush top of dough with coconut oil or olive oil.
7. Put pans somewhere warm until they are doubled in size. (takes about 1 - 1 1/2 hours)
8. Bake at 375 degree oven for 40-45 minutes or until lightly golden and hollow sounding.
Happy Healthy Cooking!!
It is a tradition that our family have pizza every Friday night. Usually when people think of pizza they think of greesy gooey fat & calories. I'm still working on getting our pizza's fresher and non nitrate loaded (tonight we are still using up some pepperoni I had in the freezer).
Tonights Menu:
Pizza (I'll describe them below)
Fresh Veggies and dip
Organic Kefired Milk, Strawberry, Flax, Virgin Coconut Oil Smoothie.
Our Pizza Recipe: Makes 2 14-15" round pizza crusts
WW Pizza Crust (currently I'm using Organic WW pastry flour but once I run out it will be fresh ground Organic Hard Red Wheat Berry's)
3 1/4 - 5 cups flour
3 1/2 tsp active dry yeast
1/4 tsp sea salt
1 1/2 cups Warm Water (I find that the hottest water I can get from my tap works perfect!)
3 Tbsp Organic Extra Virgin Olive Oil or Virgin Coconut Oil or a combination of the two.
Your choice of toppings.
For Crust:
1. Combine 2 cups flour, yeast, and salt in a large mixing bowl. Add hot water and oil. Beat with electric mixer on low for 30 seconds, then on high for another 3 minutes (this gets the gluten going). If you have a kitchen aid mixer use the dough hook and you won't have to do any hand kneeding as you ad the rest of the flour cup by cup until you get a nice soft dough ball that leaves the sides of the bowl. Add a tich of flour as needed and "knead" in your mixer for 6 minutes. If you are doing it by hand. Add flour until you get a nice dough ball then move to a floured surface and add the rest as needed while hand kneading for 8 minutes.
2. Divide your dough in half, cover and let it rest for 10 minutes. Then press or roll the dough onto your pans (stoneware is best of course). I like to sprinkle a light layer of organic cornmeal over my stone before rolling out the pizza dough.
3. After topping bake in an oven at 425 degrees F. until cheese is melted and a light golden brown usually about 20-30 minutes. I do rotate my stones so they each have time on the bottom rack so the crust gets nicely browned on the bottom. Note if you use a metal pan you will need to reduce your heat to 375 for about 20-25 minutes.
We make one pizza that has a white sauce because Samuel cannot have tomatoes. The acidic foods really aggravate his psoriasis. My white sauce is a garlic ranch mixture that I make from sour cream (preferably organic), ranch seasonings or ranch dressing, fresh garlic and freshly grated Parmesan (if I have it on hand). We love topping our white sauce pizza with fresh green, red, and or yellow peppers, red onion, fresh spinach, canadian bacon, pepperoni(which I'm not buying any more after we are done with this package), or chicken (which I don't buy any more because I don't have a pastured organic source that I can afford currently.... but when we butcher our own we'll be able to have chicken again!). We then top it off with mozzarella cheese.
The other pizza is the "kid" pizza and usually has the traditional pizza sauce, pepperoni or sausage (from our local farmer) and mozzarella cheese.
Our Friday Night Pizza rule is one piece of pizza until you eat your serving of fresh veggies or salad. Then they can have another. We used to also serve soda until I was convinced that it wasn't only the sugar that was bad but the other chemicals and additives are even more dangerous. So, water and kefir are the beverages served!
Now for the bonus recipe (while Sam is writing his book summary).
This came from one of my favorite blogs http://largefamilylogistics.blogspot.com/. She used to have a lot of great info for large families and still has her old blog which is LOADED with great info on home management and lots of recipes. She has 9 children between the ages of 16 and about 8 months. The baby was a premie so her live has slowed way down to meet his needs these past months. Anyway this weekend we made her homemade tomato soup.... YUMMY!!! I was SHOCKED as to how yummy this soup was. The kids practically licked the pot!!
Easy Homemade Tomato Soup
Chop an onion in the food processor, add celery and a carrot also if you want.
Heat half a stick of butter, or use olive oil, in a Dutch oven or large stock pot; add the chopped veggies and saute.
Mince a garlic clove or 2 into the pot.
Slowly add 1/4 c flour and blend.
Add 1 quart of any tomato product, canned or frozen, juice, whole tomatoes, sauce, fresh tomatoes -if you use puree or paste then use much less or add a lot of water. Diced tomatoes are the prettiest.
1 quart of chicken broth
pinch of baking soda
salt and pepper
1 t basil
Bring to a good rolling boil.
Add 3 c milk or cream and heat to almost boiling-do not boil. May use water instead of milk. We separate it at this point and make a small amount with goat milk for our girls that are allergic to cow milk.
Can make at 11:30 or so and serve or make early in the morning and put in crockpot to keep warm until noon.
Serve with cheese slices.
Many of you know that I have struggled with my weight for years. I go up and down in weight and the ability to hold onto changes in my diet. I LOVE food!!! The Lord has been working in my heart and teaching me that I have been worshiping food as a god in my life and allowing it to consume me. As I've been researching out healthy eating I'm reminded again that food is supposed to sustain us physically and mentally in order that we might fulfill the spiritual path the Lord has for us.
We have been changing many things about our meals and meal times. We are working toward more fresh with an ultimate goal of eating more locally fresh foods from our own garden and those in our county.
So what was for dinner tonight?
Pasture Fed Beef Cube Steak (from a farm 5 miles away)Breaded with Organic Whole Wheat Flour, salt & Pepper and fried in Virgin Coconut Oil.
Mixed Greens, Spinach, carrots, peppers, and green onions. All organic but not local.
Organic Kefired Milk made into a smoothie with Strawberries, Organic Flax, & Organic Sucanant.
I'm looking forward to spring actually hitting the great north so we can plant our greens, cole veggies, onions & potatoes. This weekend Phil is bringing home raw cow milk YEAH!! We were so excited to find a source only a few miles from the house we hope to rent. It will be good to have REAL milk again! Not stuff that has been killed then fortified with synthetic vitamins that our bodies don't even absorb!!
Oh, and for those of you who are wondering if our quest for healthier food is helping me to loose weight. The answer is yes! Maybe in a couple months I'll post some before and after pictures. For now the loss hasn't been significant enough to really notice. I just feel a lot less puffy! So..... maybe I'll start posting menu's a few times a week showing how we are making our food changes in a healthy yummy way!
Yesterday we had gluten free Blueberry cake and today we are having WW Chocolate Chip Banana Bread.
Here are the recipes:
WW Chocolate Chip Banana Bread
3/4 cup sugar (organic sucanat)
1/2 cup raw organic butter
1 cup (2 -3 ripe) banana's
1/2 cup sour cream
2 eggs
2 cups WW pastry flour
1 TBSP flax meal
1 tsp baking soda
1/2 tsp salt
3/4 cup miniature or 1 cup regular chocolate chips
1/2 cup chopped nuts
Beat together butter & sugar until light and fluffy. Add bananas, sour cream & eggs; blend well. Stir in flour, flax, bk soda, & salt; blend well but don't over mix. Fold in choc chips and chopped nuts.
Bake at 350 degrees for 55-65 minutes in a stoneware loaf pan (you can use a regular pan too just watch for too much browning). If using a regular pan be sure to grease and flour it, no need to do so if using seasoned stoneware. Bake until tooth pick or cake tester come our dry in the middle of the loaf. Cool in pan for 15 minutes then remove to rack to complete cooling.
This same recipe can be used in mini loaf pans. Put 1 cup of batter in each mini loaf pan and bake for about 45-55 minutes. This recipe freezes very well if you wrap it in saran then put it in a freezer bag.
I'll put in ( ) what to use if you are able to have gluten and casein.
GF/CF Blueberry Cake
2 cups all purpose gluten free flour mix (2 cups all purpose flour or WW pastry flour)
2 tsp Xanthan bum
1 cup sugar (organic sucant)
1 TBSP flax meal
2 tsp baking powder
1 tsp salt
1/2 cup CF margarine (1/2 cup butter or margarine) -- softened
1 cup rice milk (1 cup milk)
2 eggs
1 tsp vanilla
2 cups fresh or frozen blueberries (do not thaw)
Combine flour, Xan gum, flax, sugar, bk powd, & salt in bowl. Use pastry blender to cut in margarine until it is in course crumbs. Add milk, eggs & vanilla, stir until well blended. Pour 3/4 of batter into a 9X13 pan. Sprinkle on blueberries. Spoon remaining batter over blueberries.
Bake at 350 degrees for 35-45 minutes or until toothpick in center comes out clean.
You can put a glaze on this cake if you want but I usually don't because it is just adds extra sugar.